
This is part 1 of Kubernetes from Zero, a long, numbered series for anyone starting with Kubernetes: a junior DevOps engineer, a developer who has to deploy their own service, or anyone who has run docker run and wonders what comes next. Each part handles one or two subjects, with diagrams, commands we ran ourselves, and a cheat sheet at the end. By the end of this part you will know what problem Kubernetes solves, what “desired state” means, and you will have watched a real cluster replace a container you killed. You need a Linux shell and a little Docker; nothing else is assumed.
What you will build
You will start a one-node Kubernetes cluster on your own computer with kind (Kubernetes in Docker), ask it to run three copies of a small web server, delete one copy on purpose, and watch Kubernetes put it back without being told. Then you will change “three” to “five” and watch it add two. That small loop, where you state a number and the system keeps reality matching it, is the whole idea of Kubernetes, and the rest of the series builds on it.
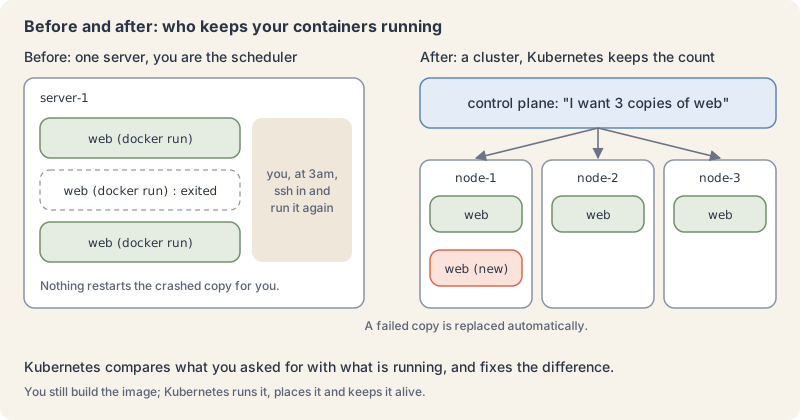
Containers solved packaging, then came the next problem
A container is a process that runs with its own filesystem, its own share of CPU and memory and its own view of the system, while sharing the host’s kernel. An image is the packaged filesystem a container starts from. With Docker you build an image once and run it the same way on a laptop, a test server and production. The Kubernetes overview describes this as the third era of deployment, after physical servers (no resource boundaries between apps) and virtual machines (strong isolation, but a full operating system per app).
Containers made packaging easy. They did not answer the operational questions that appear as soon as you have more than a handful:
- Where does each container run? Someone has to pick a machine with enough free CPU and memory.
- Who restarts it when it crashes at 3am?
docker run --restarthelps on one host, but not when the host itself dies. - How do other services find it? Containers move and their IP addresses change.
- How do you ship version 2 without downtime, and go back to version 1 if it breaks?
- How do you run ten copies instead of two when traffic grows?
Doing that by hand, with scripts and SSH, works for a while and then becomes a full-time job. A system that does it for you is called a container orchestrator, and Kubernetes is the one this series teaches.
Kubernetes in one paragraph
Kubernetes is an open source platform for running containerized workloads and services across a group of machines called a cluster. The name is Greek for helmsman or pilot (hence the ship’s wheel in this series’ pictures), and K8s is the short form: a K, eight letters, an s. Google open sourced it in 2014; the first commit landed on GitHub on 6 June 2014, version 1.0 shipped on 21 July 2015, and the project was then donated to the newly formed Cloud Native Computing Foundation (CNCF). Its design draws on Google’s internal cluster manager, Borg, and many of the first Kubernetes engineers had worked on Borg. At the time of writing the newest release is v1.37.2, published on 28 October 2026, and the project maintains release branches for the three newest minor versions, 1.37, 1.36 and 1.35 (releases page).
A cluster has two halves. The control plane is the brain: it stores what you asked for and makes decisions. The worker nodes are the machines (physical, virtual, or, in our lab, containers) that actually run your containers. Part 2 opens both halves up piece by piece.
Desired state: you say what, Kubernetes works out how
The single most important idea in Kubernetes is desired state. You do not tell Kubernetes “start a container on server 3”. You tell it “I want three copies of this web server running”, and it is Kubernetes’ job to make that true and keep it true.
You describe what you want as an object: a record such as “a Deployment called hello with 3 replicas of the image nginx:1.29-alpine”. The objects page puts it well: an object is a “record of intent”. Almost every object has two parts:
spec: what you want (the desired state). You write it.status: what is true right now (the current state). Kubernetes writes it.
A controller is a loop that watches objects of one kind and keeps nudging the real world toward their spec. The controllers page compares it to a thermostat: you set 21 degrees (desired state), the room is at 18 (current state), and the thermostat switches the heating on until the two match. It never stops checking.
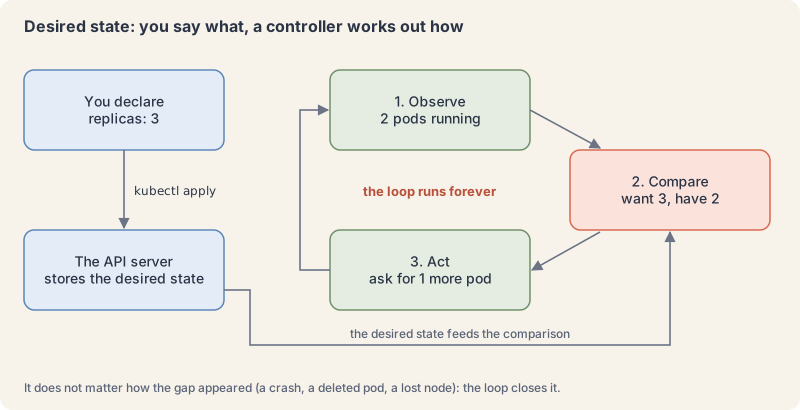
This is why the overview page says Kubernetes is, strictly, not an orchestrator in the old sense. Classic orchestration runs a fixed workflow: do A, then B, then C. Kubernetes instead runs many small, independent control loops, each driving its own piece of the current state toward the desired state. It does not matter how a gap appeared (a crash, a deleted container, a lost machine): the loop sees the difference and closes it. You will see exactly that in the lab.
A few words you will meet in the lab, defined once here and properly in later parts:
- Pod: the smallest thing Kubernetes runs, one or more containers that share a network address. Part 4 is all about Pods.
- Deployment: an object that says “keep N identical Pods of this template running, and update them gradually”. Part 7 covers Deployments in depth.
- ReplicaSet: the helper a Deployment creates to hold the exact Pod count. You rarely touch it directly.
- kubectl: the command-line tool you use to talk to a cluster.
What Kubernetes does, and what you still bring
Kubernetes covers a lot, which makes it easy to believe it covers everything. The overview page has a section called “What Kubernetes is not” that is worth reading early, because it saves weeks of confusion.
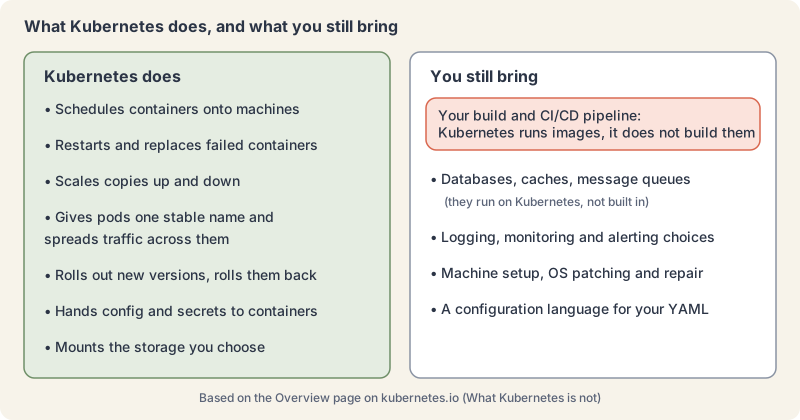
What it does, in the overview’s own list: service discovery and load balancing, storage orchestration, automated rollouts and rollbacks, automatic bin packing (placing containers on nodes by the CPU and memory they ask for), self-healing, secret and configuration management, batch execution, horizontal scaling and IPv4/IPv6 dual-stack.
What it does not do:
- It does not build your code or deploy source code. You still need a CI/CD pipeline that produces an image. A later arc of this series covers CI/CD.
- It does not ship databases, caches or message queues as built-in services. You can run them on Kubernetes, but they are applications like any other.
- It does not dictate logging, monitoring or alerting. It gives you hooks; you pick the tools.
- It does not configure, patch or repair the machines themselves.
The overview calls Kubernetes the building blocks for developer platforms. That is also why this series is long: after the core come the clouds, Helm, networking, security and the tools around Kubernetes.
Try it: your first cluster answers
This lab uses kind, which runs each Kubernetes node as a Docker container. Part 3 compares kind with minikube, k3d and Docker Desktop and explains every install step and the config file kubectl uses. Here is the short version for Linux on x86-64; on a Mac, brew install kind kubectl gives you both.
You need Docker running. Then install kubectl and kind (both commands come from the kubectl install page and the kind quick start):
curl -LO "https://dl.k8s.io/release/$(curl -L -s https://dl.k8s.io/release/stable.txt)/bin/linux/amd64/kubectl"
curl -Lo ./kind https://kind.sigs.k8s.io/dl/v0.33.0/kind-linux-amd64
chmod +x kubectl kind
sudo mv kubectl kind /usr/local/bin/
1. Create a cluster. It takes under a minute once the node image is downloaded:
kind create cluster --name k8s-from-zeroCreating cluster "k8s-from-zero" ...
...
✓ Ensuring node image (kindest/node:v1.37.0) 🖼️
...
✓ Starting control-plane 🕹️
...
✓ Installing CNI 🔌
...
✓ Installing StorageClass 💾
Set kubectl context to "kind-k8s-from-zero"
...2. Ask the cluster who it is. This is the moment the cluster answers you for the first time:
kubectl cluster-info
kubectl get nodes
Kubernetes control plane is running at https://127.0.0.1:45267
CoreDNS is running at https://127.0.0.1:45267/api/v1/namespaces/kube-system/services/kube-dns:dns/proxy
...
NAME STATUS ROLES AGE VERSION
k8s-from-zero-control-plane Ready control-plane 106s v1.37.0One node, Ready, running Kubernetes v1.37.0. Your port number will differ.
3. Declare a desired state: three copies of a web server.
kubectl create deployment hello --image=nginx:1.29-alpine --replicas=3
kubectl rollout status deployment/hello
deployment.apps/hello created
Waiting for deployment "hello" rollout to finish: 0 of 3 updated replicas are available...
Waiting for deployment "hello" rollout to finish: 1 of 3 updated replicas are available...
Waiting for deployment "hello" rollout to finish: 2 of 3 updated replicas are available...
deployment "hello" successfully rolled outkubectl get pods -o wideNAME READY STATUS RESTARTS AGE IP NODE ...
hello-6bb4847c46-b8jpw 1/1 Running 0 0s 10.244.0.6 k8s-from-zero-control-plane ...
hello-6bb4847c46-cqlsj 1/1 Running 0 0s 10.244.0.7 k8s-from-zero-control-plane ...
hello-6bb4847c46-lspbh 1/1 Running 0 0s 10.244.0.5 k8s-from-zero-control-plane ...Each Pod got its own IP address. The random suffixes are generated by Kubernetes, so yours will differ.
4. Break it on purpose. Delete one Pod, using a name from your own list, and look again straight away:
kubectl delete pod hello-6bb4847c46-b8jpw
kubectl get pods
pod "hello-6bb4847c46-b8jpw" deleted from default namespace
NAME READY STATUS RESTARTS AGE
hello-6bb4847c46-7997z 1/1 Running 0 1s
hello-6bb4847c46-cqlsj 1/1 Running 0 1s
hello-6bb4847c46-lspbh 1/1 Running 0 1sStill three. b8jpw is gone and a new Pod, 7997z, took its place within a second. Nobody ran a restart command: the ReplicaSet controller saw “want 3, have 2” and created one.
5. Change your mind. Ask for five:
kubectl scale deployment hello --replicas=5
kubectl get deployment hello
deployment.apps/hello scaled
NAME READY UP-TO-DATE AVAILABLE AGE
hello 5/5 5 5 2s6. Read the controller’s diary. Kubernetes records what its controllers did as events:
kubectl get events --field-selector involvedObject.kind=ReplicaSet --sort-by=.lastTimestampLAST SEEN TYPE REASON OBJECT MESSAGE
2s Normal SuccessfulCreate replicaset/hello-6bb4847c46 Created pod: hello-6bb4847c46-lspbh
2s Normal SuccessfulCreate replicaset/hello-6bb4847c46 Created pod: hello-6bb4847c46-b8jpw
2s Normal SuccessfulCreate replicaset/hello-6bb4847c46 Created pod: hello-6bb4847c46-cqlsj
2s Normal SuccessfulCreate replicaset/hello-6bb4847c46 Created pod: hello-6bb4847c46-7997z
1s Normal SuccessfulCreate replicaset/hello-6bb4847c46 Created pod: hello-6bb4847c46-dd5cj
1s Normal SuccessfulCreate replicaset/hello-6bb4847c46 Created pod: hello-6bb4847c46-plm2lSix creations: the first three, the replacement 7997z, and the two extra for scaling to five.
7. See spec and status side by side. This is the desired-state idea in plain YAML:
kubectl get deployment hello -o yaml...
spec:
progressDeadlineSeconds: 600
replicas: 5
...
status:
availableReplicas: 5
...
readyReplicas: 5
replicas: 5
updatedReplicas: 5You wrote spec.replicas: 5 (through kubectl scale); Kubernetes reports status.readyReplicas: 5. When they match, the loop is at rest.
8. Say hello. As a last check, forward a local port to the Deployment and fetch the page (part 4 explains port-forward; run the curl in a second terminal, then press Ctrl+C in the first):
kubectl port-forward deployment/hello 8080:80curl -s localhost:8080 | grep -i title<title>Welcome to nginx!</title>9. Clean up. Delete the Deployment. Keep the cluster if you are going straight on to part 2; otherwise delete it too:
kubectl delete deployment hello
kind delete cluster --name k8s-from-zero
On our lab machine, Docker had no internet route from inside the cluster, so we loaded nginx:1.29-alpine into kind with kind load docker-image before step 3. On a normal laptop the image pulls by itself and you do not need that step.
When it goes wrong
kind: command not found or kubectl: command not found. The binary is not in your PATH. Check with ls -l /usr/local/bin/kind /usr/local/bin/kubectl, and run the sudo mv line again. Part 3 covers checksum checks and other install methods.
Cannot connect to the Docker daemon. kind needs a running Docker (or Podman). Start Docker Desktop or the Docker service, then run docker ps to confirm before kind create cluster.
A Pod stuck in ErrImagePull or ImagePullBackOff. The node could not download the image, often because of a typo in the image name or tag. We created a Deployment with the tag misspelt as nginx:1.29-alpinee; after a minute:
NAME                    READY   STATUS         RESTARTS   AGE
typo-65bd6f65b7-fkxnw   0/1     ErrImagePull   0          64s
kubectl describe pod <name> shows the reason in its Events section. On a machine with internet access the message says the image or tag was not found; ours said i/o timeout because our lab cluster had no internet route. Fix the tag (kubectl set image deployment/<name> nginx=nginx:1.29-alpine) or delete the Deployment. Part 21 is a full guide to Pod failures.
You deleted a Pod and it “came back”. That is not a bug: it is the Deployment doing its job. To remove Pods for good, delete or scale down the Deployment that owns them.
Cheat sheet
| Task | Command or field | Note |
|---|---|---|
| Create a local cluster | kind create cluster --name k8s-from-zero |
needs Docker running |
| Delete it | kind delete cluster --name k8s-from-zero |
removes the node containers |
| Where is my cluster | kubectl cluster-info |
prints the API server address |
| List nodes | kubectl get nodes |
STATUS should be Ready |
| Run N copies of an image | kubectl create deployment hello --image=nginx:1.29-alpine --replicas=3 |
pin a tag, never latest |
| Wait for it | kubectl rollout status deployment/hello |
returns when all copies are available |
| List Pods with IP and node | kubectl get pods -o wide |
add -A for all namespaces |
| Change the desired count | kubectl scale deployment hello --replicas=5 |
the controller adds or removes Pods |
| See desired vs current | kubectl get deployment hello -o yaml |
compare spec with status |
| See what controllers did | kubectl get events --sort-by=.lastTimestamp |
events expire after a while |
| Find out why a Pod is unhappy | kubectl describe pod <name> |
read the Events section at the bottom |
| Remove the app | kubectl delete deployment hello |
its Pods go with it |
Minimal manifest of today’s main idea, the same Deployment written as YAML (part 5 explains writing YAML instead of using kubectl create):
apiVersion: apps/v1
kind: Deployment
metadata:
  name: hello
  labels:
    app.kubernetes.io/name: hello
spec:
  replicas: 3                # the desired state
  selector:
    matchLabels:
      app.kubernetes.io/name: hello
  template:
    metadata:
      labels:
        app.kubernetes.io/name: hello
    spec:
      containers:
        - name: nginx
          image: nginx:1.29-alpine
Recap and what is next
- Containers solved packaging; Kubernetes handles placing, restarting, scaling, finding and updating them across many machines.
- A cluster is a control plane (the brain) plus worker nodes (where containers run).
- You declare desired state in an object’s
spec; Kubernetes reports reality in itsstatus. - Controllers are endless loops that close the gap between the two, which is why a deleted Pod comes back.
- Kubernetes does not build your code, ship your database or pick your monitoring: you bring those.
Next: part 2, a guided tour of the control plane and the nodes, following one kubectl apply until a container runs. Coming tomorrow.
The Campfire
CommentsThanks. Your comment is waiting for the desk. Once it is approved it appears here within about a minute.
Add a comment